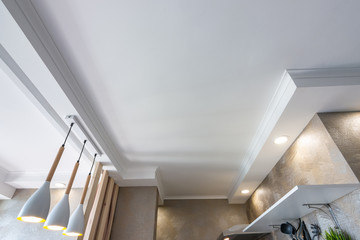
Act Ceiling is often a design feature that can add depth to a room, whether it is plain and smooth or painted and adorned with art. They can also be vaulted or beamed, bringing visual interest and adding to the overall design of the space.

The most common type of ceiling is the dropped ceiling, which is suspended from the structural elements above. Pipework or ducts can run in the gap above, and insulation and fireproofing material can be placed here.
Fiberboard is a composite material that is made from wood chips, plant fibers, and other recycled materials, such as cardboard or paper. These materials are then bonded with synthetic resin and then pressed into rigid sheets to form a panel that can be used for many different purposes.
Traditionally, fiberboard was manufactured from plant or wood fibers that included grass, jute, straw, sugar cane stalks, flax, hemp, and newspaper. Other types of waste wood, such as oat hulls and spent hops, were also recycled into these panels.
Today, most fiberboards are made from wood chips and lignocellulosic fibers, and they are bonded together with a resin. Some panels also contain additives to improve their strength, durability, and moisture resistance.
When it comes to ceilings, fiberboard is a good option for most homes because it’s cheap and easy to install. However, it’s also susceptible to moisture damage and may warp when it’s exposed to humidity.
Because of this, you should keep your fiberboard well-protected and dry. Whenever possible, use an anti-molding spray to prevent mold or mildew from growing on the ceiling. You can also add a layer of drywall over the surface to create a finished, waterproof surface.
To install a ceiling using fiberboard, you first drill pilot holes into the board along its long sides to match the lines of the wall studs. Next, you hold the panel in a corner where two walls meet and screw it into place with wood screws.
If the end of your fiberboard doesn’t fit tightly against the wall, cut it off with a table saw. Be sure to wear a dust mask and eye protection when working with these materials, as you could inhale the particles of resin and other chemicals.
Once the fiberboard is in place, you can add a finishing coat of paint or stain to make it more attractive. You can also apply a polyurethane coating for added moisture resistance and durability.
The most common type of fiberboard is medium-density fiberboard or MDF. It’s a cheaper alternative to particleboard and can be made from recycled or virgin wood. It’s available in a variety of thicknesses and densities, depending on the manufacturer.
Metal panels are a great option for ceilings and are available in a wide range of styles. They can be used in many different spaces, including office buildings, warehouses, and schools. These versatile materials are durable and easy to install. They are also available in a variety of colors, shapes, and finishes.
Corrugated metal sheets have a unique look that adds a touch of industrial style to any space. These can be paired with painted metal and neutral-colored framing to create a modern aesthetic that pops against other building materials such as wood or brick.
These can be installed on either a solid surface or on top of an existing sub-surface such as drywall or plaster. To make installing the metal easier, mark studs with a pencil before you begin. This will help you easily see where to line up the screws as you install the panels.
The most important thing to keep in mind when installing these panels is to make sure that they are not too tight together. Leave a bit of room between each panel, and use the screws to seal any gaps that might occur. These small gaps can be the difference between a rustic look and one that is clean-cut.
If you are working in an area where the ceiling might get wet, consider using a screw with a rubber gasket attached to it. This allows the screws to self-seal the holes as you install them, ensuring that the metal doesn’t get wet or damaged.
Before you start, determine the number of panels and cornice pieces that you need for your project. The manufacturer will calculate this based on the layout and room dimensions that you provide them.
Once you’ve done that, find a buddy or two who’s willing to assist you with the work. Often, it’s best to have someone around during the work process who will ensure that you stay safe and keep your tools in good condition.
Once your metal panels and cornice pieces are in place, you can install light fixtures to complete the room’s design. It’s a great way to add a finishing touch to any room and can be very rewarding for your home improvement efforts.
Plastering a ceiling is an easy way to add a unique look to your home. It is also an excellent and affordable option to give your walls an authentic old-world feel.
It can be made from a variety of materials, including lime and gypsum. However, it is important to understand that plaster is only a finished product, and it needs to be applied properly in order to provide a strong, durable surface.
Before starting a plastering job, you need to prepare the area that you will be working on. This includes making sure that the floor is clean and free of debris and that you have drop sheets available to protect your carpets from plaster spillage.
Once the surface is prepped, you need to mix up your plaster mixture. You can use a mixer to do this, or you can simply sift out the powder with your hands. Ensure that you mix the plaster thoroughly, making sure there are no lumps in the mixture.
The ingredients that you need for a successful plaster include sand, cement, and lime, as well as other aggregates such as clay. A binding agent is also needed to bind the aggregates together, which is what gives plaster its strength and durability.
When the ingredients are mixed together, they form a wet slurry that has a chemical set, which dries when water is added to it. The amount of moisture in the slurry determines how ductile it will be, which is to say, whether or not it can be spread easily.
You can use various additives to accelerate or retard the set time, or even a combination of them. Some traditional binders, like lime and gypsum, are commonly used, but other minerals can be added to make the mix more effective.
Once your plaster is ready, you can begin applying it to your ceiling. Using your trowel, spread the mixture across the surface of the ceiling in a thin layer. You can start with one edge of the trowel angled away from the ceiling and work your way in, pushing the trowel flatter and flatter to flatten the plaster against the ceiling.
Drywall is the most common material used to cover walls and ceilings. It is made from gypsum, paper, and additives that help it absorb moisture, and it comes in many types. Some drywall is fire-resistant, and some are not. It is also available in different thicknesses to meet the needs of various projects.
It is important to know how to install drywall so that it will look good and last for years. A properly installed drywall ceiling can be a great addition to any room.
First, you need to determine the exact layout of the walls and ceiling in your home or commercial building. Then, you can decide what type of drywall you will use to complete the job.
If you have a ceiling with cracks, holes, or other damage, it will be necessary to repair the damaged drywall before installing new ones. If you don’t repair the drywall, it could lead to mold problems and water damage.
To repair the drywall, start by marking off a square or rectangular outline around the area where the wall or ceiling has been damaged. Measure the length and width of the line to determine if you will have to cut the drywall out of the wall or ceiling and reinstall it.
Next, you will need to add furring strips to the ceiling to support the drywall. These strips are typically 1″ x 3″ or 1″ x 4″, and they are placed perpendicular to the roof framing. They are also used to create a strong attachment point for the drywall and to flatten any wavy surfaces.
Once the strips are in place, hang the first sheet of drywall and push it tight against both the walls and ceiling. Make sure that about half of the furring strip is showing on each edge and that there are no gaps between the drywall and the ceiling. If you’d like, you can wedge a homemade tee under the sheet to hold it temporarily as you drive a few screws along each strip.